Nowadays people prefer to use SSDs and not the standard HDDs that used to come in the low-budget devices. It is because of the robust performance that SSD provides compared to HDD. However, when you install a new SSD on your device, the first thing you have to do is to initialize it.
Initializing SSD in Windows 10 isn’t a hard thing to do and can be done just by making a few clicks. However, if you don’t know the process or find it difficult to initialize SSD in Windows 10, then you landed on the right page.
To help you out we decided to cover this simple guide that will help you with the process of initializing SSD in Windows 10
How to Initialize SSD in Windows 10
You can take the help of the Disk Management tool to initialize the SSD installed on your device. FYI, Disk Management is a nifty tool that comes preinstalled in Windows and allows users to manage disk and partitions of drive.
Before you start following steps on Windows 10 SSD initialization, we would like to that you that this process is irreversible so ensure you do it correctly. If any step is not followed correctly, then might permanently lose the data on the disk or damage the drive as well.
Here’s goes the steps:
Before you continue with the process, ensure you have properly connected the SSD to your PC.
In the Start menu search type, Disk Management, when it ‘Create and format hard disk partitions‘ appears in search results, click to open it.
Ensure the disk that you want to initialize is Online, if not, right-click on it and from the context menu click on Online to make it online.
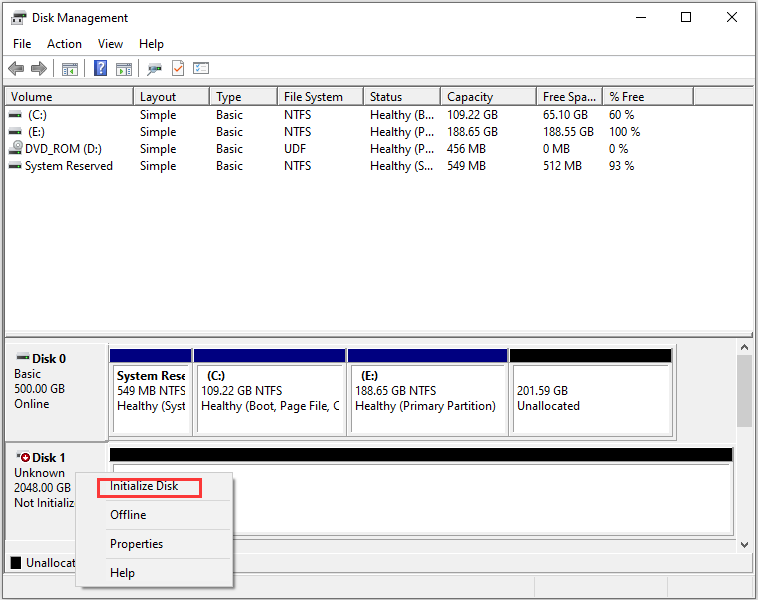
After that, you need to make a right-click on the SSD and select Initialize Disk.

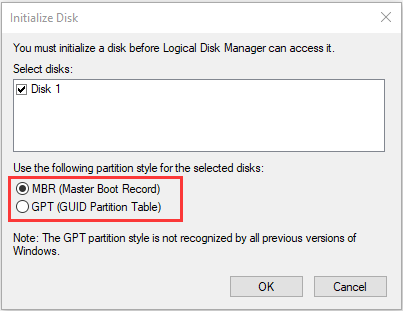
After that, when the Initialize Disk dialog appears, select the SSD that you want to initialize along with the partition styles. There will be two partition styles: GPT and MBR.
- GPT- GPT is the most preferred and commonly used partition style for SSDs. It is compatible with disks bigger than 2TB and also supports the latest UEFI-based systems.
- MBR– MBR on the other hand is a partition style used by older PCs. It is most probably used by removable drives like memory cards.

After you have selected the partition style, click on OK to continue.
Once the initialization of SSD completes, right-click on the SSD and select New Simple Volume.
After that, you need to follow the on-screen instructions to complete the New Simple Volume Wizard to allocate volume on SSD.
What If There Is No Initialize Disk Option?
It is possible that sometimes when you try to initialize SSD using the Disk Management tool, you might not find the Initialize disk option. Fret not! It’s a common issue and occurs if you are trying to use a used SSD on your PC.
In such cases, you will first have to clean the disk using Diskpart and then try Initializing the SSD.
To clean the disk with the Diskpart, follow the steps given below:
Launch Elevated Command Prompt in Windows 10.
In the command prompt, type: diskpart and hit Enter to open Diskpart.
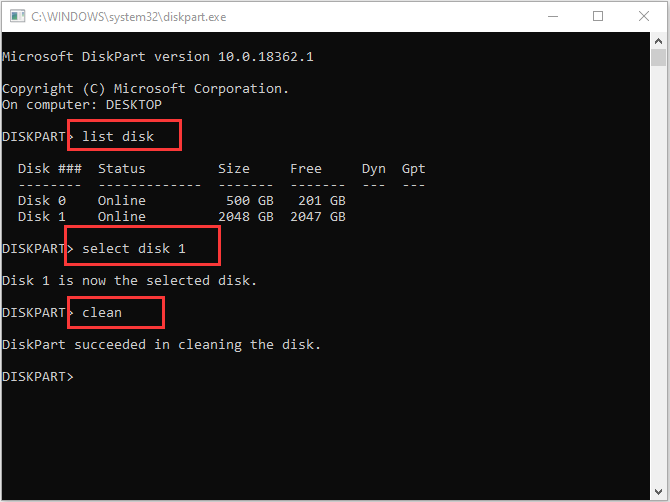
In the Diskpart, type: list disk and hit enter. This will list all the disks installed on your PC.
Now enter the select disk num and execute it. You will have to replace num with the actual number of the disk (0,1,2 and so on)

After you have selected the disk, type: clean and hit Enter. This will remove all the files and data from the disk.
This will clean the SSD using the Diskpart. After the disk has been cleaned you can use the Disk Management tool to initialize the disk.
So these are steps on how you can initialize SSD in Windows 10. Why don’t you try these steps, if you have any queries, then feel free to ask us via comments.
